Tuesday 19 March 2013

Maintain a chart of accounts


Maintain a chart of accounts

When build your owns company accounts.
To build your own co. account open Peach-tree software.


We select option of existing company. When we select this option new window will be open,


Brows the window and select your company. Next window will open

.


Select option of maintain from toolbar and in maintain list select option of chart of accounts window will be open. The new window will open 

There are three things to be filled
·        Account I’d
·        Description
·        Account types
Use these spaces accurately and save it.

 By using toolbar of “main chart of accounts”. You can use the option of close, save, delete, new for any amendment. 


Maintain Customer /Prospectus:

For maintaining customer account, when we open an existing company in peach tree software we select the option of “Maintain” from tool bar and select customer/prospects

When you will chose this option a new window will be open that is below

This above window will be open. There are some requirements to be filling like Customer ID, Name. and there are five tabs: general, sales defaults, payment defaults, customer fields and history. There you will be write customer ID and name and fill the General tab’s requirements and after all this if u want to save it without fill any requirement which show below


 you will not be able to save it till u write the GL Sales Acc.

 And when you fill this number with the help of look up button, now you will able to save this customer account.
In the end of General tab there is the beginning balances requirment, when you u select this new window will be open

You will fill there the invoice number, date when you dispatch the goods, in which amount, and A/R id with look up button.


When you open sales defaults tab here will be some things to b fill like which sales rep deal with this customer, P.O(purchase order number), resale #, which price level you will set for this customer
When you select payment defaults new window will open

There are above things to fill like card holder name, address, and city. State, country and like this.
When you select customer fields tab this window will open

Here you require filling 4 options.
And the last tab of history new window will open

 
Here you have the period history in which transaction is made, sales and cash. And customer since (when this person was you customer). And 3 type of dates and amounts to be fill.

Default information, customer

For maintain or record the default customer information, we will go to the maintain Menu in tool and select default information and then from sub tool list we will select “customers…” like below.

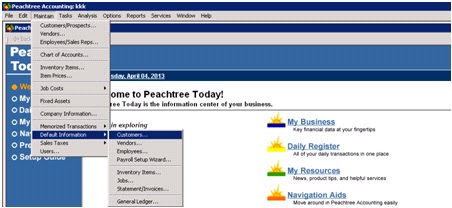
When you will do so as mention above the new will open

The 1st tab is for payment terms and condition information. Here at left side standard terms and at right side their condition. Hare standard terms are
o   C.O.D (cash on delivery): cash received at the time of delivery.

o   Prepaid: cash received before delivery of goods.
Same as above window will appear
o   Due in number of days: we mention here due days for payment by customer, discount% age, and set the credit limit.

o   Due in days of next month: we will decide a day when payment is made by customer


o   Due at the end of month: at the last day of every month is decided for payment


We also fill GL Sale Account, and Discount Account.
2nd tab is for account aging.
o   Invoice
o   Due date
Use will chose whether you want start aging from invoice date or due date which you decide for payment. Aging categories here you select your own choice.

3rd tab for customer fields. We can change this and the last the check box here

When you select 4rth tab of finance charges, new window will open

First check box on left is for whether you charge finance charges on this customer on not. If yes you will select this. And you decide rate per annum and the rate on balance above, and minimum finance charges. Second section of this tab is required whether you charge interest on finance charges for this customer and you write the finance charge GL Account code. And the last section required to you whether you print finance charge warning massage or not, if you select this a warning massage will print the customer invoice.

Thursday 14 March 2013

Set of a new company


Set of a new company
Open Peach tree software for set up of a new company records. Following window will appear


You want to establish a new company so you select the “set up a new company” option. After selecting this option the following introductory window will open

  
The above window guide you the rest off the process. After clicking the next following window will appear


This window will require your company information i.e.  Name, address, telephone no, business type etc. You should have at least write your company name. After fill this and clicking the next the following next window will appear


 The next step is to select the chart of accounts among these 5 options. Here you can chose the chart of accounts already developed by the software of many sample companies for this you will chose the 1st and 2nd radio button. Or you can copy the chart of accounts from existing Peach tree company or another accounting software compatible with Peach tree for this you will chose the 3rd  and 4 rt  radio button. Or you can chose the last option that is “build your own company” for this you will select last option. After selecting last option click next and following window will appear


Here you are requiring choosing the accounting method which you are thinking more beneficial for your company. There are 2 methods
1.      Accrual
           Record the transaction on the occurrence of the transaction.
2.      Cash
           Record the transaction on the receipt and payment of the transaction.
After select accrual accounting method click next then next window will open


In this phase you will chose the posting method. By selecting real time posting method the transaction are posted to general ledger as they are entered and saved. While in Batch, transaction are saved by program and then posted in a group. Select real time and click next the next window will open


Here you are required to select the accounting period. Normal accounting period is of 12 months. Select 1st option and click next, next window will open


 In this step you will chose the month when the accounting period will start and the month when first time the transaction will recorded. After fill this and click next the last window will open


By clicking finish the new company set up completes.

Sunday 10 March 2013

how to open a file in word

Opening Microsoft Word Documents

We'll shortly add an address to the top of our Library Complaint letter. Before we do that, we'll learn how to open a file. After all, you might have closed down Microsoft Word, or your computer might have crashed. The result being that you no longer have your library letter loaded into Word. So here's how to Open a file you have saved, and want to work on again.
From the File menu, click Open:

Click File > Open from the menu bar
The Open dialogue box appears, and looks like the image below:

the Open File Dialogue Box

The Open dialogue box looks very similar to the Save As dialogue box. "Save in", "File name", and "Files of type" work in exactly the same way as the Save As dialogue box. Notice, though that the File name text box is blank, and the Open button is not available. It has been greyed out.
The reason that the Open button is greyed out, and therefore not available, is that text box is empty. Once you select a file, the Open button will be ready for us.
But the text box is empty because no file has been selected. A file is selected from the larger white area in the middle. Clicking on the file once with the left hand mouse button will select a file. In the previous image, there was only one file available for selection - a document called "rrKeyCaps.doc". That is not the one we want.
To locate the file we want, we need to open the folder called "My WP Projects". Because that's where we saved it. You can see from the image that this folder is in the list of folders, just below the folder called My Pictures:
A list of available folders

You can see also that we are in the folder called My Documents. To open up the folder we want, simply double click it. This will take us inside the My WP Projects:

Double clicking a folder takes you inside of that folder
The whole Open dialogue box now looks like this:

The new Open File Dialogue

The file we want, Library Letter, has been clicked on. As a result, the Open button is no longer grayed out. We can go ahead and click it. When we do, our letter will open in Microsoft Word.
To recap then on how to open a file. Do the following
  • Navigate to the folder where the file was saved
  • Click on the file to select it
  • Click the Open button